
Changing a dressing at home
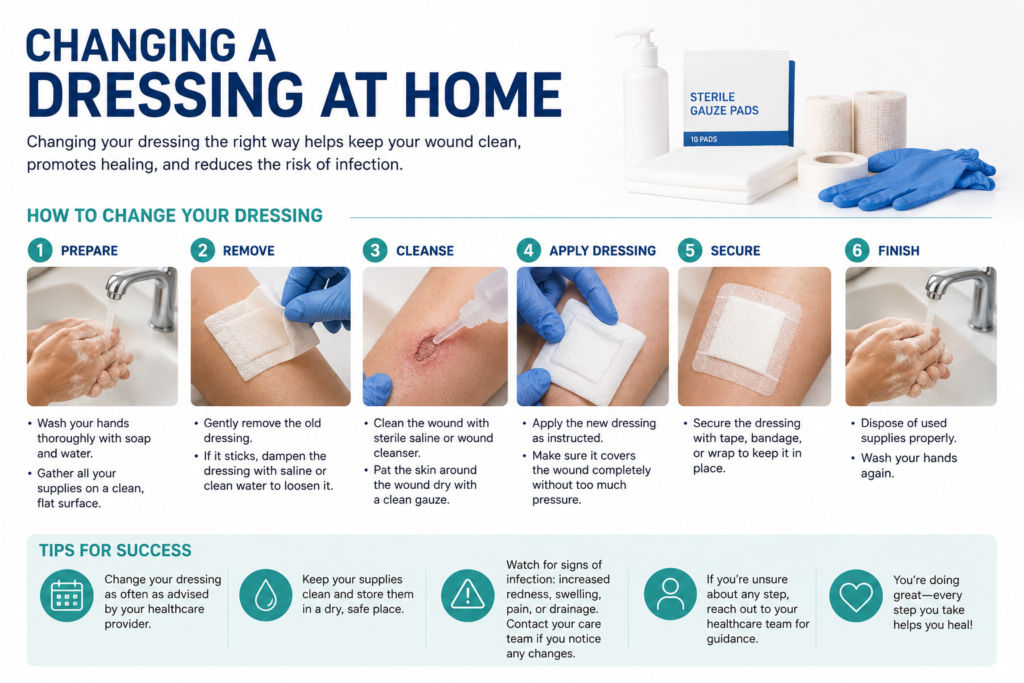
Most people are shown this once, in a clinic, while distracted, and then sent home to do it alone. Here is the routine written down, along with the small details people are most often unsure about.
Your own instructions come first. If your care team told you something different about frequency, cleansing solution, or technique, follow them.
Before you start
Set the time. Pick a moment when you are not rushed and there is good light. If you have been prescribed pain relief for dressing changes, take it thirty to forty-five minutes beforehand so it is working when you need it.
Gather everything first. Once the old dressing is off, you do not want to be hunting through a drawer. Lay out the new dressing and any packing, cleansing solution, gauze or non-woven swabs, gloves, a waste bag, tape or a bandage if needed, and a barrier product if you use one.
Clear a surface. Wipe down a table or tray. Do not put supplies on the floor, on bedding, or on a bathroom surface that is still wet.
Wash your hands. Soap and water, twenty seconds, including between the fingers and under the nails. Dry with a clean towel or paper towel, then put gloves on.
Taking the old dressing off
Support the skin with one hand and peel the dressing back low and slow, in the direction the hair grows, rather than lifting it upward at an angle. Lifting tears fragile skin.
If it is stuck, stop pulling. Wet it thoroughly with saline or clean water, wait a minute or two, then try again. Silicone adhesive remover wipes make this much easier if you can get hold of them. A dressing that has dried onto the wound bed will take new tissue with it, which sets healing back and hurts a great deal.
Look at what comes off. Before you bin it, note how much fluid is on it, what colour the fluid is, and whether it soaked out to the edges. This is genuinely useful information at your next appointment and easy to forget by then.
A note on smell. Dressings often smell when they first come off, simply because fluid has been sitting under an occlusive cover. Judge the odour after you have cleaned the wound, not before. Some dressing types, especially hydrocolloids, produce a yellowish gel that looks and smells alarmingly like pus and is entirely normal.
What “clean” actually means
This is the part most people get wrong, usually by doing too much.
Use sterile saline, or clean drinkable tap water, unless your team specified something else. Both are well supported for routine wound cleansing.
Do not use hydrogen peroxide, undiluted antiseptics, iodine, or alcohol on an open healing wound unless a clinician has specifically told you to. They kill the new cells rebuilding the tissue along with the bacteria, and routine use slows healing down.
Irrigate, do not scrub. Pour or gently squirt the solution over the wound to lift debris away. If you wipe, use a fresh swab for each stroke and work from the wound outward, so you are not dragging bacteria from the surrounding skin into the wound bed.
Leave healthy new tissue alone. Bright red, slightly bumpy, fragile tissue is exactly what you want to see. It bleeds easily. Do not scrub it.
Dry the skin around the wound, not the wound itself. Pat with a clean swab. The surrounding skin needs to be dry for adhesive to stick. The wound bed should stay moist.
While it is open, take thirty seconds to look
- Roughly how big is it in centimetres? Length, width, and depth if you can see it.
- What colour is the base? Red or pink is healing tissue. Yellow, tan, or stringy is slough. Black or brown and leathery is dead tissue.
- What do the edges look like? Flat and advancing, or rolled and thickened?
- How is the skin around it? White and soggy means too much moisture. Red and irritated may mean a reaction to the product, or early infection. Dry and flaking needs moisturiser on the surrounding skin, not on the wound.
A phone photo taken from the same distance each time, with the date, is more useful than any description you will manage from memory.
Putting the new dressing on
Protect the surrounding skin with a barrier film or cream if it is getting soggy or if adhesive is irritating it.
Size it properly. The dressing should extend past the wound edges onto intact skin, usually by two to three centimetres, so the adhesive is not sitting on the wound.
If you are packing a cavity, pack it loosely. The material should make contact with the wound surfaces without being stuffed in. Tight packing presses on the tissue and slows healing.
Use one piece for packing, and count it. If you use more than one, write down how many. Packing left behind by accident is a real and preventable problem.
Write the date on the dressing or on a note nearby, so you know when it went on.
Then bag the waste, take your gloves off, and wash your hands again.
Keeping a record
A few lines each time is enough. Date, what the wound looked like, how much fluid, pain out of ten, and anything unusual. Bring it to appointments. Clinicians make better decisions with three weeks of your notes than with your best recollection of a bad Tuesday.
Stop and get advice if
- Bleeding does not slow after ten minutes of steady, direct pressure.
- The dressing has dried onto the wound and will not release even after soaking.
- You can see bone, tendon, or anything shiny and structural in the wound bed.
- You cannot retrieve packing you put in previously.
- Pain has increased sharply since the last change.
- The wound is noticeably larger or deeper, or has a foul smell that persists after cleansing.
- The skin around it is spreading red, hot, and swollen, or you have a fever or chills.
- You have run out of supplies. Do not improvise with household materials. Call and ask.
This describes a general clean-technique routine for wound care at home. Some wounds, including surgical wounds and wounds in people with weakened immune systems, need a stricter sterile technique. Follow the instructions your own care team gave you.